Renew Your USEA Membership for the 2023 Season Today LEARN MORE

Ready to spice up your arena routine this winter training season? In this series, we are revisiting some of our favorite Grid Pro Quo articles from Eventing USA to help you use the off-season to your advantage and keep you and your horse in tip-top shape for when it's time to get back out there. Click here to check out other past Grid Pro Quo exercises!
If you’ve ever ridden in a clinic with me, you’re probably familiar with this course and especially this grid. I use it often because of its versatility and the countless options available for riders of all skill levels. Overall, this set up is meant to help horses with their technique and riders with both their position and ability to create and maintain the correct canter for the questions they are asking of their horses. The distances in the grid encourage the horse to get a bit deeper to the final jump in the line, which challenges the rider to be confirmed in their equitation and their ability to keep the horse in balance for the final jump – this grid really teaches the rider and horse to not only become comfortable with the final stride being slightly shorter than the stride before but also how to get a great jump from that moment.
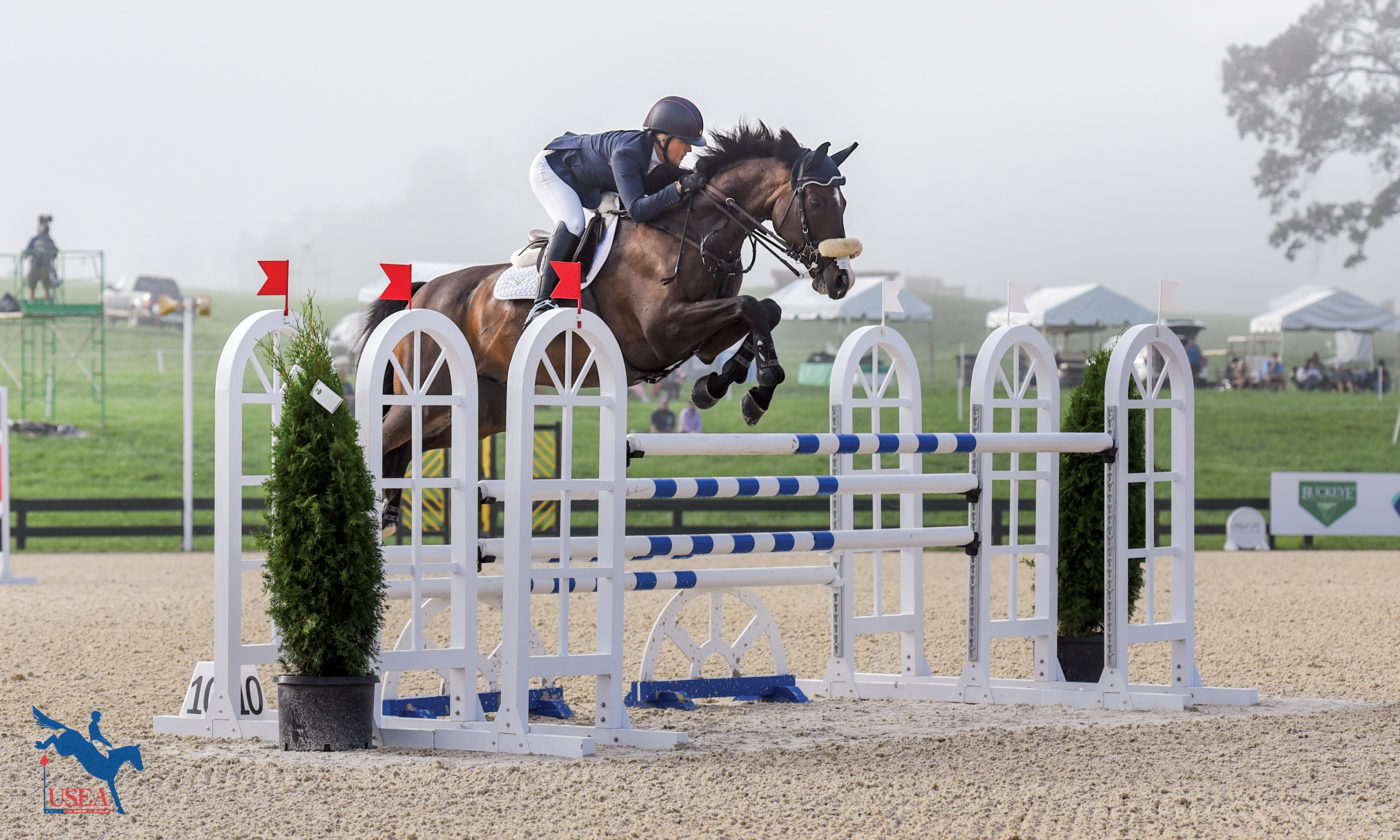
One of two things often go through a rider’s head a couple strides away from the jump: “Thank goodness” or “Oh geez.” It’s when those “Oh geez” moments occur – which typically arise from not knowing when the horse is going to leave the ground – that the rider needs to be their best for their horse. They need to stay confirmed in their position and maintain the horse’s balance and keep their leg on so that the horse then has the ability to negotiate a long or short distance well. Too often in these “Oh geez” moments we see riders go “fetal” (dropping their hand leaning forward and taking their leg off) which in turn encourages a bad jump – a chip, a stop, or a discombobulated attempt from a long distance. Remember the horse always mirrors the rider’s body position so if you go fetal in one of those “Oh geez” moments you are asking your horse to suddenly change his balance by getting on his forehand, sticking his hindend out behind him, all the while allowing him to get behind your leg because you took it away. This isn’t the best recipe for success!

When warming up, I like to take a minute or two to focus on my student’s leg position. The foot should be at about a 45-degree angle away from the horse’s side with a little bit of weight on the inside of the stirrup. When looking at your leg, you should be able to see a slice of the sole of the riders boot from the side, which creates a secure calf-to-ankle connection with the horse’s side. I ask my riders to maintain this leg position in two point, at the halt, and then back to full seat. Too often you see people get in two point by taking their leg totally off the horse, standing up and losing the connection. With enough attention to your leg position on the flat, it will start to become habit, which will only help you over fences.
I also like to review how your full seat is different in a jumping saddle than in a dressage saddle, with your upper body being slightly more forward in a jumping saddle. This is very important because if you get behind the motion on the flat before a jump, it’s much more challenging to be with the motion over the jump. I encourage my students to practice and make the automatic release a habit which I believe to be safest for event riders especially while riding on varying terrain. I always encourage athletic stance and tell my students that if they were ever to be dropped out of the sky they should easily land in an athletic stance over their feet.
And to round out my rider position checklist, I look to the rider’s arm. The rider’s lower arm needs to always be in line with where you want the horse’s mouth to be, with your elbow slightly in front of their shoulder. This position allows for a much more elastic arm. With this arm position and the correct rein length, the rider should easily be able to grab mane when in a jumping position, and if they can’t, then their reins are probably too long or they are not in a good athletic stance.
In terms of what you’re looking for from your horse, I like to make sure my students work on their horse’s adjustability by making sure they can lengthen and shorten their horse’s stride easily and rhythmically within each gait. Remember that the dial for collection is different than the dial for speed. Maintaining the tempo along with varying lengths of stride is a crucial skill in creating the correct canter for the jump. Once you can create the correct canter for the jump and you can maintain the rules of the canter to the jump while maintaining a good position, then your horse should be able to negotiate a range of distances well. Once you’re able to do this consistently then you will learn to develop a correct eye for a distance.
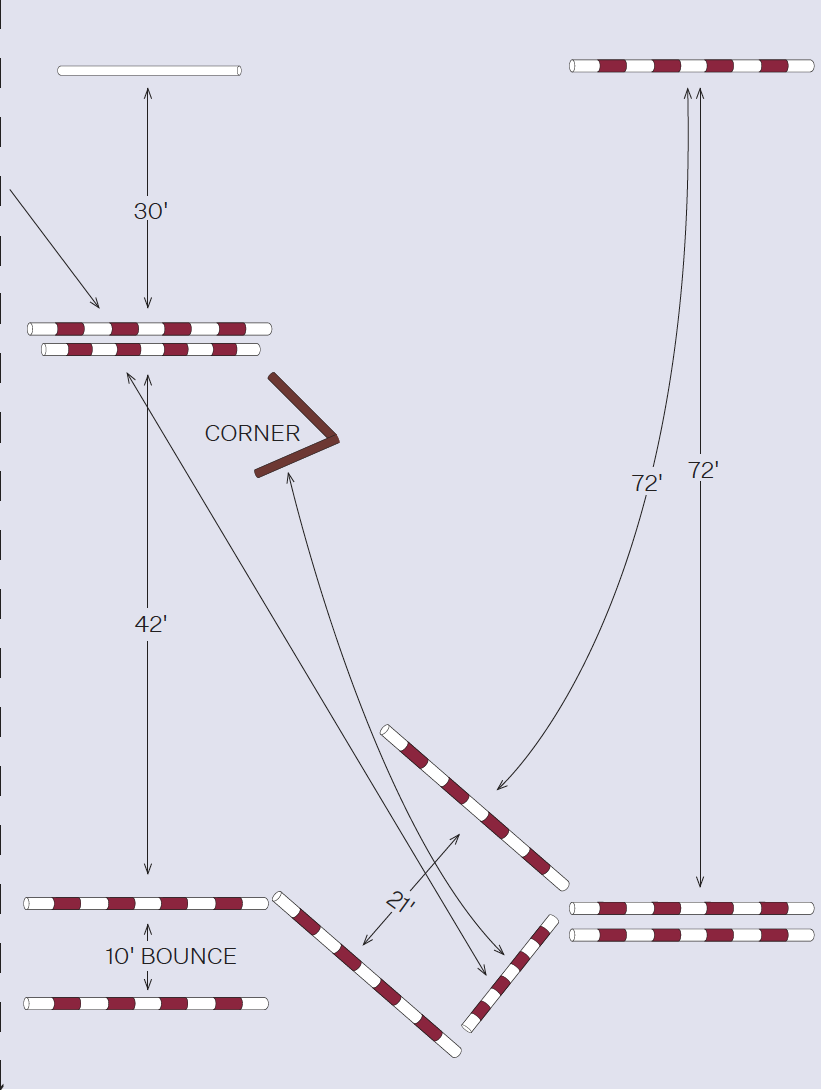
Initially, I don’t teach trying to have an eye to a fence, because everyone has a “fabulous” eye one-to-two strides away, but then it’s too late to make a change, though it’s not too late to be aware of the situation you’re in. Instead, I like to teach having, and maintaining, a good canter. As the rider, it’s your job to create the length of stride that’s appropriate for the job at hand. You will need a different canter for a 10-foot bounce than you will for a 36-foot combination, and a different canter for a 21-foot one-stride than a skinny off a long approach. Learning which canter you need for each situation, and then being able to seamlessly change from one canter to the next is the key to jumping success.
After you’ve effectively and efficiently warmed up at the canter, you’re ready to start jumping! I like to start by using the bounce of the grid line (I typically have them set as cross-rails), and then simply canter over them on a circle – first to the left away from the rest of the grid and then to the right. I like to warm up over the bounce because bounces are good for rider position. If you fold too early or too much, you’ll end up with your horse’s head in your face. To avoid this, you want to concentrate on letting your arm follow the horse’s mouth, not on how much you fold. You want to be able to land balanced over your leg and with your horse in the same canter as their approach.
After you’ve done this in both directions, I will have riders jump through the whole grid at a low warm-up height. It’s not uncommon for the horse to not be prepared to go straight after the bounce since they’ve been circling over it for a few times, so be prepared to steer. Once they get the idea that they’re now going straight, you’ll start to feel the importance of landing in balance and keeping your upper body tall. I like to tell my students to land as if they’re riding straight out of the ring, with your eyes up and shoulders tall. I gradually raise the oxer a little and the final vertical a bit more to where the horse and rider are really challenged to land in balance from the oxer and keep the horse connected and straight for the final vertical. The distance between the oxer and final vertical is only 30-foot which feels very short after riding the bounce and the flowing three strides to the oxer. The straightness over the final vertical is incredibly important because you do not want to allow your horse to deal with a tighter distance by drifting or getting crooked; if they are consistently kept straight then they will jump higher and learn excellent technique.
Once you’ve jumped through the gymnastic line a few times, you can start to make small courses with the other jumps. The 72-foot lines are always a super easy and wonderful number to practice if you have the space in your arena. It can be five or six strides, and is a good place to practice adjustability between jumps. Your 21-foot one-stride is a great place to practice riding to a deep distance. And the angled line from the oxer to the skinny is a great place to practice speed and line of direction. Sometimes jumping angled fences can give the rider some anxiety, but if you can remember to keep the rules the same, you will have success. Overall, jumping questions are made easier by the rider’s understanding of how to make the right canter for the horse and that particular question and by maintaining their correct position. Riders need to be able to give their horses all the ingredients they need to succeed. And oftentimes, this can bedone by going back to the basics.
A consummate athlete and compassionate rider, Allison Springer is a popular clinician, traveling throughout the country to teach each year. Her classic position and strong fundamentals highlight her talent, poise, and partnership with the horse. Known for dedication and consistency, Springer has consistently named to the United States Equestrian Federation’s High Performance Training Lists, a proven training ground for national team riders, and was also short listed for the London Olympic Games. To learn more about Springer, visit www.allisonspringer.com.