Renew Your USEA Membership for the 2023 Season Today LEARN MORE

Ready to spice up your arena routine this winter training season? In this series, we are revisiting some of our favorite Grid Pro Quo articles from Eventing USA to help you use the off-season to your advantage and keep you and your horse in tip-top shape for when it's time to get back out there. Click here to check out other past Grid Pro Quo exercises!
Throughout my everyday training, I try to keep a big focus on rider responsibility versus horse responsibility. To keep it very simple, the preparation for any jumping exercise – namely creating a good, balanced canter to jump from – is completely the rider’s responsibility. Once you get on your line for the exercise, it’s the rider’s job to stay balanced in the middle and out of the horse’s way, as the responsibility is transferred to the horse.
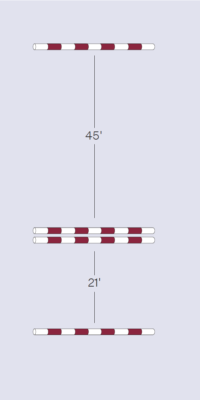
The purpose of this exercise is to combine footwork with coursework. The 21-foot one stride distance is your footwork piece, and the 45-foot three-stride distance is your coursework piece. The challenge is maintaining three strides of even length to your last vertical, and for the horse to remain careful for the last vertical.
Regardless of the level that you’re competing, your horse is more likely to get flat and unbalanced the longer you have between fences. This is why practicing how to develop and maintain that perfect show jumping canter is so important. Three strides is the perfect distance to set yourself up for success.

Before you even jump your first jump, I like to make sure that my horse is sufficiently warmed up through their body. I try to start with a walk hack whenever possible, and then ask them to lengthen and come back within each gait, along with some low-stress lateral work. While your expectations of the horse will change depending on their level of training, your horse needs to listen to all of your aids, regardless of whether you’re flatting or jumping.
Once I’m confident that my horse is properly warmed up on the flat I will start trotting and cantering over ground poles that I’ve scattered around the arena. This is the time for the rider to help create the shape and balance to the canter that is appropriate for jumping. But remember, at all times the horse needs to be responsible for their own feet.
From here, I will simply start with the whole line of jumps set quite low for your level of jumping. I find this set up to be unintimidating, so for a horse that knows how to jump, it shouldn’t be too difficult to start with all the jumps in place. Of course if you have a green horse, you can start with the poles on the ground and build it up jump by jump.
As you work through the exercise, you want to keep a few things in mind before you raise the jumps. The biggest thing is to analyze your three-stride combination and make sure that your horse is taking three even strides. If your horse is landing and rushing a little bit, I will add a landing pole after the oxer, and perhaps add another one in front of the last vertical. On the opposite end of the spectrum, if you have a horse that is a little lazy and behind your leg, I will add in a canter circle before the first vertical. I will practice going forward and collecting back on this circle, making sure I can go beyond my perfect canter and come back to a canter that’s a little smaller than perfect, and finally settle in the middle on that perfect canter before heading to the first vertical.
Another thing to consider while working through this exercise is if your horse is truly straight through the entire exercise, which includes the few strides before and after the entry and exit. If I have a horse or rider that is really struggling with straightness, I will add guide poles on the ground to the jumps to help them out. It’s important to keep riding after the last vertical, so I will often times give my students something to ride towards. You can get creative with this, and it can be anything from a set of cones to ride through, or a cavaletti set on a bending line. Remember that your transition back down to the walk between jumping rounds is also part of your exercise. Make every transition count, rather than celebrating after the last vertical and letting your horse fall on their forehand or get crooked.
As you work through the exercise, there are two ways of making it more challenging. You can build the jumps up gradually until they are at your competition height. Or you can make the jumps more visually interesting by adding or changing the fillers throughout your jump school. And for more advanced horses, you can use the distance to challenge them a bit, by shortening the distance a little to teach them to compress and move their feet faster.
In addition, as a way to help work on finding that perfect distance while on course, you can add a ground pole two strides away from the first vertical to help practice finding that distance. Just remember that the more poles you put on the ground, the more your horse has to think. I tend to either add poles or raise the jumps, but rarely both at the same time.
Oftentimes I find that working through this exercise is enough for one jump school. But as your horse becomes more familiar with it, you can always use this as a warm up for working on course work.
Based at Annie Eldridge’s Setters’ Run Farm in Vass, North Carolina, Ariel Grald has competed through the five-star level on her long-time partner Leamore Master Plan. Grald enjoys developing young horses through the top levels, as well as helping riders reach their goals. To learn more visit www.settersrunfarm.com.