Renew Your USEA Membership for the 2023 Season Today LEARN MORE

Ready to spice up your arena routine this winter training season? In this series, we are revisiting some of our favorite Grid Pro Quo articles from Eventing USA to help you use the off-season to your advantage and keep you and your horse in tip-top shape for when it's time to get back out there. Click here to check out other past Grid Pro Quo exercises!
There are many reasons why this is one of my go-to exercises for my jump schools. While it seems simple on paper, it’s a great exercise for teaching rider responsibility while focusing on your position, while also teaching horse responsibility with a focus on footwork.
From an instructor's point of view, I like teaching with this exercise because it’s a good way for the rider to feel confident and learn that mistakes aren’t always bad. The simplicity and repetitiveness of the exercise allows the rider to concentrate solely on their position and accuracy without having to worry about an entire course of jumps. It’s a great chance for riders to learn that mistakes happen and they can handle it!
From a trainer's point of view, I like riding over this exercise for many of the same reasons as I like teaching with it. It’s a great way for horses to work on their footwork without making things too complicated. The key to correctly using a square rail is to never make the jump so high that if they make a mistake it will be bad. The purpose of using a square rail is to make it so that if the horse gets to a jump a little wrong they are encouraged to be clever in order to leave the rail up.
Regardless of if you’re aiming for your first starter trials or your first one-star, this exercise will undoubtedly teach you something.

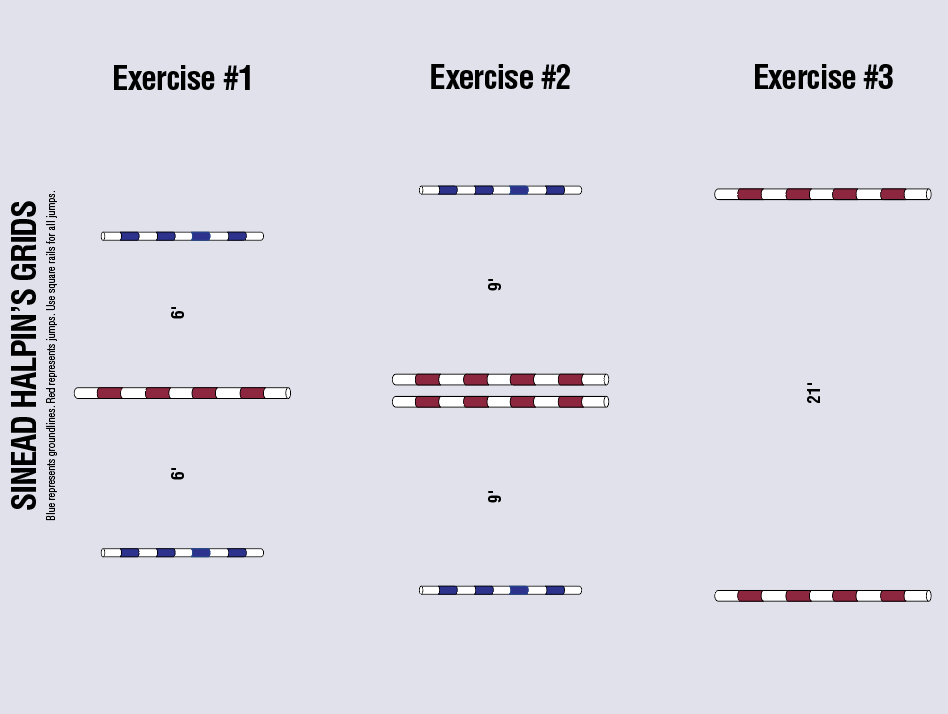
Once you are properly warmed up, I typically start by letting my horse trot through the exercise with the rails on the ground. If I’m riding a less experienced horse I will let them trot through the rails a few times before making a small vertical. Remember to gradually raise the vertical as appropriate for your level. For example, a Training-level pair will only jump a 3’-3’3” vertical at most. The focus should be on the rider’s position and the horse’s footwork, not the height of the jump. After each time through the exercise, you should land and halt, then do a turn on the forehand before heading back to the same vertical from the opposite direction.
On paper, trotting a small vertical should be easy. But anyone who regularly practices this will tell you that it’s very easy to jump ahead or get left behind when trotting jumps. The best way to work out the kinks is to focus on creating a nice, rhythmical trot well before you turn to your jumps. And then simply focus on maintaining your perfect trot to the jump, rather than worrying about getting to the perfect distance.
If you’re still having trouble staying with your horse through this trot fence exercise, there’s one thing that tends to really help my students. Simply do not look at the jump! The more you stare at the jump, the more you will anticipate the take off. You’re not going to see your stride at a trot fence, so stop trying. The best thing to do is to look past the jump once you’re on your line and just feel the jump come to you.
Before you move onto the next piece of this exercise, you want to be able to check off a few things first. You want to be able to reliably land on either lead after your vertical. If you have a horse that tends to always land on one lead, do a figure-eight over the vertical to encourage them to switch leads. If they are persistent in wanting to always land on one lead, I will first try to figure out why. Is my horse uncomfortable physically somewhere? Am I crooked in the saddle, causing my horse to compensate? Or is it a training issue that needs to be corrected? Regardless of the reason, don’t expect to fix this—or any—issue in one training ride. As long as you’re making progress in the right direction, you should be happy!
The next step is to take the vertical and make it into an oxer with a ground rail 9 feet in front of it, making it a cantering exercise. Again, this exercise comes down to rider and horse responsibility. It’s a common flaw for the rider to be overprotective and hold their horse off the pole, which causes you to end up riding a bit backward. All this means is that the rider has their priorities wrong, which isn’t the end of the world, but this is a great exercise for showing them the importance of concentrating on finding a good rhythm and letting that carry you to your ground rail.
Depending on what you’re looking to accomplish with your horse you can dictate the type of oxer you set up. If your horse is on the greener side, you can keep it simple with an ascending oxer. If your horse is more experienced, you can make a small square oxer. Or if your horse has a tight back, you can make a wider oxer, or even add a ground rail 12 feet on the landing side.
Once you start cantering the oxer, this is when straightness issues tend to pop up. While I will sometimes put V rails on the jump—always starting wide—riders should always remember that so much can be fixed with a good landing. So if you make it a priority to land in a straight line, it will carry over to your approach.
After you’re comfortably and confidently doing these first two exercises you should have accomplished two things: From the trot exercise, I’m looking to become more in sync with my horse, and I’ll want to have the horse-rider responsibilities worked out. From the canter exercise, I’m looking for what shape I need from my horse, and gathered more information about my horse and how they jump. Every horse is different, and some may need to spend more time doing the trot exercise while others may need to spend more time doing the canter exercise.
The next step is to take the oxer and turn it into a 21-foot one-stride, with the second vertical quite a bit higher than the first one and with no ground line. Your second vertical should be a level higher than your competition level. This is a lot of footwork though, so make sure your horse can handle the height that you’re competing at first before raising the jump.
This simple line using square rails tests the carefulness of your horse. And by taking the “base” away from the second vertical, the horses naturally want to be more careful. I tend to only jump through this twice before calling it a day. But if I’m looking to increase the challenge for my upper level horses I will simply play around with my approach, varying my approach from a short approach to a long approach.
At the end of the day, the horse’s responsibility is to jump well and the rider’s responsibility is direction. Straightness and rhythm go hand in hand. You have to learn to trust the rhythm, trust your connection, and trust your responsibilities. And in this case, once you’re two to three strides out, let the exercise do the work and have the confidence to stay in the middle of your horse and let them sort through the exercise.
Sinead Halpin Maynard is an international competitor and trainer and has been riding at the Advanced level since 1999. In 2011, Halpin earned and maintained her spot on the world stage, proving to be a top competitor as well as a class ambassador of the sport by placing third in her first CCI4* (now CCI5*-L) at the Kentucky Three-Day Event. Based at her and her husband, fellow eventer Tik Maynard’s Copperline Farm in Citra, Florida, Halpin is an ICP Level II certified instructor and enjoys teaching students of all levels and ambitions. To learn more about Halpin, visit: www.sineadhalpin.com